System administration isn’t something that’s obvious to everyone, and it’s a subject that, when it’s more to do with the basics of networking and Linux, can seem a lot more daunting than learning about the latest trendy technologies (Docker, Terraform, Kubernetes, etc.).
Also, with the bombardment of information and easy access to computer content and tutorials often more interesting than “classic” lectures, students are less and less attentive, present or participating.
Is it a waste of time to regain their attention? No !
Many solutions exist, and in this article I’ll describe how I’ve applied the principles of “gamification”.
Define pedagogical objectives
For the Department of Studies, I had to set up an advanced Linux system administration course, aimed at students who were already familiar with the command line, had some theoretical knowledge of networks and a good grounding in Unix programming.
When preparing a course, it’s important to define the pedagogical objectives you want to achieve. For me, the aim here was to get the students to practice networking in concrete terms (without DHCP) and to get them to debug various problems common to Linux system administrators (both at system and network level). Of course, a number of opening topics are also covered as we go through the various learning stages.
The subject: Matrix Restarted
An important part of gamification is the context in which the students will evolve. Over and above the pedagogical objectives, it’s a question of finding a mission for them, one that’s similar to a game.
Yes, we’re talking about combining concrete business needs with a fictional universe that makes them want to progress towards their objectives.
In computer engineering schools, the Matrix movie is a sacred bible. Every student knows the story and at least a little about the universe.
Over the course of a few hours, students will embody one of their favorite heroes, in his universe, with the ultimate goal of : “connect to the Internet to reach Zion”. In Matrix Revolution, Neo must reach Zion to save her.
From the very first minutes of the exercise, the environment is set up:
And, even more important: their final objective is explained to them in a few lines, right from the start.
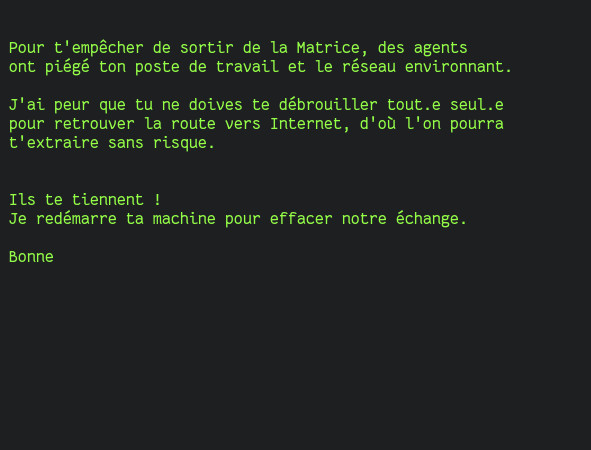
For them, connecting to the Internet is an easy, reasonable and accessible task.
That’s the key to getting them involved: arousing their curiosity about what they’ll get when they get to Zion! At this stage, of course, the students have no idea that there are many adventures in store for them…
Individualized follow-up
For the teacher, one of the most important aspects of this kind of exercise is to be able to help students in difficulty. It’s well known that many students don’t raise their hands to ask for help. On the contrary, I’ve noticed that in this exercise, it’s mainly the students who are doing the best who tend to ask for help with the bonus parts, which are obviously more difficult.
During practical work, the main source of drop-out I’ve observed occurs when the teacher is ahead of the student: not only do they have to hurry to catch up, but they can’t benefit from the advice given orally by the teacher. It’s unfortunate that he doesn’t interrupt the lesson to ask for help, but then again, many students don’t dare.
In this exercise, because everything is well scripted, I was able to set up a system that supervises each student. This has two main advantages:
-
It allows me to monitor overall and individual progress: I can go and see those who are behind schedule to deal with their difficulties individually; and when it’s the whole class that’s stuck on a step, I can intervene without any student feeling behind: we reflect collectively on the blocking point, which encourages individual reflection, including from those who don’t participate orally.
-
While grading is usually a chore, here by monitoring student progress, it’s easy to find out what learning objectives each student has achieved, so you can grade them accordingly.

But then, what are the contents, the different stages through which the student passes?
The course “scenario”
Step 0 : Get root privileges on the machine
In a company, it can happen that you have to work on a machine that was installed a long time ago, or by a trainee who wasn’t familiar with the procedures and passwords to be used, and yet you need to recover access to it.
The first step in the course is for students to “root” their machine. This means bypassing the login screen, becoming an administrator without knowing the password.
It’s a “common” action that doesn’t call on any vulnerabilities: all you need is access to the operating system’s loading program.
While many students are familiar with the theoretical aspect of “rooting”, very few have actually experienced it (and are aware that it’s so simple that they might want to take steps to counter this possibility once they’re in the working world).
The sandbox for learners
The entire course takes place in a specially prepared machine room, and each machine is a sandbox for the student using it. Students are on a server-driven workstation (technically, the machines are simply configured to boot over the network, in PXE).
The system used is a true standard GNU/Linux system, based on the Alpine distribution, in order to be as light as possible. The kernel is specially compiled to have a limited number of drivers, in order to limit unintended actions such as overwriting the host disk.
As client workstations are not booted with a physical or remote disk attached, there is no persistent data: in the event of a reboot, the student returns to the initial situation. As the exercise does not require the student to reboot voluntarily, this is not usually a problem, but it does guarantee that the teacher will return to a healthy/known state if he has to help a student who has destroyed his system.
There is one exception, because in real life, after booting our machine in single mode to overwrite the root password, we reboot back to classic mode.
Whatever mode the machine has been unmarshaled in, a program runs in the background to monitor changes made to the /etc/shadow file, containing the machine’s account passwords.
As soon as a change is made, the file is forwarded to the server unmarshalling the machines.
To avoid overloading the server when all the students change their passwords, instead of recreating the complete system image, I take advantage of a trick related to the archive format used: there is no header or global file index, so a new file can be added at the end of the archive, in the expected format :
echo etc/shadow | cpio -oAF system.cpio
The operation is not very resource-intensive, but you’ll need to ensure that the server’s disk space is large enough, since each student will have his or her own complete system archive (around 30 MB per student).
Step 1 : Understanding kernel modules
After passing the login screen, the student is presented with a full shell, with which he can run any installed commands he wishes. There’s no graphical interface, the students know how to use a shell, but here we show them that the raw terminal is an option.
Keeping in mind his mission to reach Zion by connecting to the Internet, the student will look to see if he is well connected:
42sh# curl https://nemunai.re
curl: (6) Could not resolve host: nemunai.re
Maybe we can reach an IP?
42sh# ping 9.9.9.9
PING 9.9.9.9 (9.9.9.9): 56 data bytes
ping: sendto: Network unreachable
OK, do we have an IP?
42sh# ip address
1: lo: <LOOPBACK> mtu 65536 qdisc noop state DOWN group default qlen 1000
    link/loopback 00:00:00:00:00:00 brd 00:00:00:00:00:00
This approach is normally acquired through regular use of Unix systems, but it’s important to remember these commands because some people, more at ease with graphical interfaces, would have looked for Firefox or the Network Manager dialog box.
The last command should be of particular interest, as it will undoubtedly be an unprecedented situation!
Only the lo local loop interface is present, and it’s not configured.
Where in the world is the Ethernet card used to start up the machine?
This situation can be an opportunity to go back over the mechanics of booting, and explain the role of the operating system loader to make the difference clear.
The aim of this stage is to introduce the kernel modules and the modprobe command for loading them.
Depending on the affinity of the audience, they can be left to grope around with lspci to explore the hardware, get to grips with the manufacturers’ names and search the /lib/modules tree for drivers that might match.
For students wondering how a conventional system automatically loads modules, you should of course tell them about udev and mdev.
These programs will themselves read the information they need from /sys.
Step 2: Network configuration
After loading the kernel module, the network card finally appears:
42sh# ip address
1: lo: <LOOPBACK,UP,LOWER_UP> mtu 65536 qdisc noqueue state UNKNOWN group default qlen 1000
    link/loopback 00:00:00:00:00:00 brd 00:00:00:00:00:00
    inet 127.0.0.1/8 scope host lo
       valid_lft forever preferred_lft forever
2: eth0: <BROADCAST,MULTICAST,UP,LOWER_UP> mtu 1500 qdisc pfifo_fast state UP group default qlen 1000
    link/ether 52:54:00:b4:bc:42 brd ff:ff:ff:ff:ff:ff
    inet 172.23.0.42/24 scope global eth0
       valid_lft forever preferred_lft forever
But it’s not configured.
Some will be familiar with DHCP, but no utilities for automatic network configuration are installed on the system.
To start up a machine on the network, you need an automatic configuration service. For the purposes of this exercise, this is a subnet dedicated exclusively to machine startup, and does not give access to the Internet, which may confuse students at this stage: normally, you get an IP and therefore the Internet!
So, to avoid confronting this received idea at this stage, I’ve decided to remove all automatic configuration programs.
The only way out is to configure the network manually. They have the actual network topology at their disposal, as well as an IP address to use.
This step enables them to learn how to read a topology and practice with subnet masks. Some students will forget the mask when adding the IP to their interface, preventing them from contacting the server.
The risk of such an exercise is that several students will take the same address and create IP conflicts, which would make the exercise far too difficult. To eliminate any risk of conflict, each student is given a protected address: this address is registered in the server’s ARP table so that it can only communicate with its own workstation.
When their network interface is configured, it’s a good idea to talk to them about address allocation protocols such as DHCP, Neighbor Discovery Protocol, Router Advertisement, etc.
Step 3: Recognize a kernel panic
As this is a multi-stage challenge, students have to unlock the stages by sending a unique token to a validation server.
To do this, they are provided with a program to generate these tokens:
42sh# adlin
{
    "login": "nemunaire",
    "challenge": 1,
    "token": "db82f32ef6f2563663cb6ffa4826cfade0b822b56b4c0bc526873f3ba224bbae53b8fc6494b408720fb48f858eded6cd649e55edd8620d4ab587e1119c86072e"
}
At each step, the server address is given, as this is what modulates complexity, as we’ll see in the following steps.
For the very first token, you are asked to send it to a machine on the local subnet, so no additional configuration is required:
42sh# adlin | curl -d @- http://172.23.0.1/iamalive
Except that in doing so, the student will trigger a kernel panic: a program specially designed to exploit a kernel bug will crash the machine.
While calling the adlin or curl program independently is harmless, when they are called together, an additional program is launched:
[ -t 1 ] || init-crypto
Of course, there’s no cryptography to initialize: it’s all about disguising a binary whose sole purpose is to create a kernel panic.
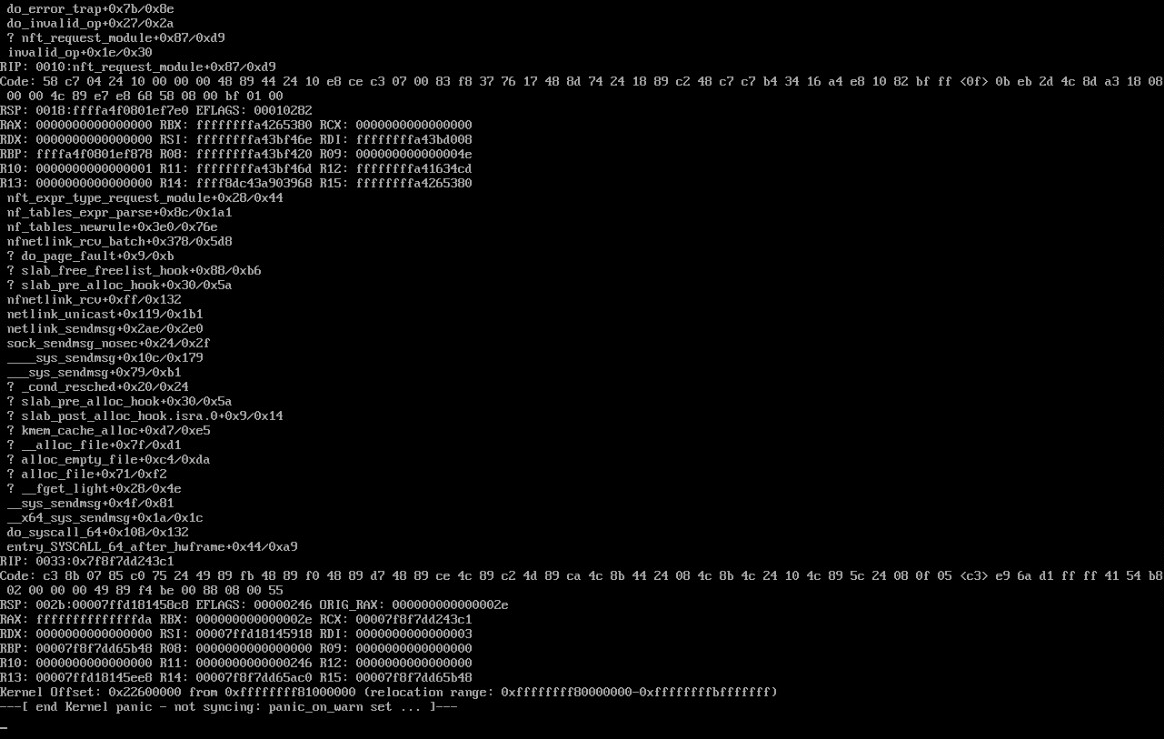
Few students have ever experienced a kernel panic in the past. And for most, their reflex will be to restart the machine without looking at it, or trying to understand it.
The aim of this step is therefore to demystify the kernel panic screen. Above all, it’s about reading the very last line:
---[ end Kernel panic - not syncing: panic_on_oops set ... ]---
Sometimes, with a little help on the English terminology of the verb to set, the student understands that in fact this is a particular kernel parameter, which could probably be reversed, so that it is no longer defined and therefore no longer causes the crash.
Step 4: anchoring knowledge
Apart from the interest in understanding a kernel panic, the forced reboot of the workstation that this induces, even though the environment is not persistent, forces the student to redo the network configuration.
As this is the key skill selected for this course, forcing the student to redo this step a second time helps to fix the method in his memory.
Step 5: Kernel configuration
Before trying to validate the first token again, and in order to avoid another kernel panic, the student must disable the kernel functionality that is causing this behavior.
This is where we start to get into aspects of Linux unknown to students.
Yet many advanced features (such as the cgroups used by Docker) are designed around the same configuration principles: through a tree of virtual files.
Guided by the subject, the students explore the /proc/sys folder, looking for the famous panic_on_oops file whose contents need to be changed in order to disable the functionality.
Finally, the students can validate their first token, with the satisfaction of having learned and discovered many important things.
Step 6: Network routing
Back on our thread, in order to access the Internet, an IP alone isn’t enough. We need to tell our system the address of our router, which will be responsible for routing our packets to the Internet.
However, the topology only gives us the router’s domain name by default. But it’s impossible to resolve a domain name at this stage. To do this, the subject suggests we finish configuring our system by taking advantage of local services: a name resolver and a time server are accessible in a DMZ that we can reach with a dedicated network route.
Networking is often about routing. For a student, routing means letting the company’s box or router manage this task. However, it will soon be up to him to manage these routers, hence the importance of showing here an example of “complex” routing, with both a default route and a static route to our DMZ.
A second token is expected to validate the routing. Some students will have created a default route at this stage and it will work, but they’ll see later that it causes them problems. In any case, this is a useful learning stage.
Step 7: Time anomaly
Whereas up to now all tokens had to be sent to a web server over an unencrypted connection (in plain HTTP), we’re now asked to validate a token on an address using the HTTPS protocol.
So far, everything has seemed coherent, but this seemingly straightforward step - switching from HTTP to HTTPS - will reveal an unexpected problem, to say the least:
42sh# curl https://172.23.200.1/challenge
curl: (60) SSL certificate problem: certificate is not yet valid
More details here: https://curl.haxx.se/docs/sslcerts.html
At startup, the machine is randomly assigned an aberrant date.
The student must then realize that the certificate is indeed valid and that the problem lies with the machine’s clock.
As a system administrator, it’s not uncommon to come across a machine whose clock has gone back to 0 because of an empty or faulty battery.
Once again, the key is to take the time to read the error message.
Many students rush to add the -k option to ignore certificate errors, but the validation token is based on the clock.
If the clock is too far off, the student receives a message reminding him that reflexive use of the -k option is not desirable.
To get past this stage, students are expected to discover clock synchronization tools, using the DMZ’s NTP server.
Once this stage has been validated, it’s important to review the certificate stores with the students. Under normal circumstances, on a freshly installed machine, such a request should not have worked, as it is impossible to obtain a valid TLS certificate for a private IP. In this case, I had placed an additional authority in their system store, which I control. So I’m able to intercept any encrypted traffic their applications might emit. This is a particularly important point of awareness.
Step 8: Domain name resolution
We’ve seen that we need to resolve domain names to obtain the address of our default router (but also domain names in general).
Once the student’s system can reach the DMZ, it can easily access the resolver server.
To enable the system and all programs on his machine to use domain names, the student learns to manipulate the /etc/resolv.conf file.
At the margin of this step, to arouse interest in DNS, a token is to be found in the zone used for the course.
Step 9: Default route
We’ve already added a static route, now we need to add the default route.
Like most important actions, this is the second time the student will be adding a route, which makes it easier to learn the mechanism.
The token to be validated at this stage requires access to both the DMZ and the default route. Students who had not done so at this stage will be forced to do so, as they cannot yet access the Internet despite the default route…
Step 9 bis: IP conflict madness
Up to now, the student has had a protected IP, but to validate the step he must choose an IP from a /16 range.
It turns out that every time I’ve taught this course, many students have chosen the router’s IP rather than a random IP or one similar to the one assigned to them on the initial subnet.
To ensure that all students without exception are confronted with this problem, the server performs ARP poisoning on all addresses seeking to contact it.
The students are thus forced to find the server’s true MAC among all the MACs responding to requests. They also discover the static entries in the ARP table.
This step also opens the door to ARP spoofing and the dangers of unprotected wireless access points.
Step 10: Traceroute
The final step involves understanding how packets are routed on the network.
By discovering the traceroute tool, students can see that their packets are systematically destroyed at the 4th router!
The exercise is somewhat cavalier, but it goes back to the kernel configuration. The lifetime of IP packets has deliberately been set to 4, to produce this result. The student must therefore find the right parameter to set a more appropriate value, which will enable the packets to reach their destination.
As an opening remark, it’s worth explaining that this maximum number of routers to be traversed can be used to recognize a target’s operating system.
The End
Finally, students are invited to connect to a remote server displaying the Star Wars movie in ASCII Art.
Perhaps a nod to the next course…?
Bonus
1. Reading the code
Some curious students will have gone to read the scripts provided in the system, including the famous adlin script, causing kernel panic.
A bonus token is hidden in the script, to reward curiosity.
2. Monitoring awareness
Each student is actively monitored to record his or her progress. The online/offline presence of his or her machine may raise a need for help.
The ICMP packets sent to each student contained a particular hexadecimal string, which they can observe by analyzing the traffic on their Ethernet card.
3. Missing file on disk
A virtual disk is created at system start-up, a file is created with a unique token, then deleted.
This bonus is designed to show the experienced student how to use file recovery tools.
4. Send an e-mail with the command line
The aim of this bonus is to introduce students to the format of e-mails, making them aware that the sender is just a header and can be easily falsified.
Variants
I’m showing here a standard framework for the exercise I’ve designed. Depending on expected needs, it is possible to deviate from this scenario.
In particular, you can add VLANs (if the underlying network doesn’t filter them), tunnel technology, IPv6, a final SSH connection requiring secure key generation, etc.
Conclusion
A 3 to 4 hour session is needed for 80% of students to pass all the levels, with 30 to 50 students.
Students systematically come away from this course with stars in their eyes. On the one hand, they’re grateful for all the learning they hadn’t had the opportunity to do before, or that they didn’t even know they were doing. On the other hand, they’re grateful for the originality of the format, which stimulates them and confronts them with concrete problems that they have to overcome, with reduced frustration thanks to the personalized support that can be provided with live feedback on progress.
Even so, such a course format takes a considerable amount of time to prepare. Initially, I spent almost 165 hours on it, divided between:
- 40 hours of initial reflections on objectives and scenario,
- 20 hours to carry out some proofs of concept on the grey areas to be clarified,
- 100 hours designing the server and various mechanisms,
- 5 hours of on-site testing to ensure the compatibility of the entire scenario.
Demonstration
Here’s an overview of all the steps, raw, without explanation: